오늘은 Firebase를 활용해서 회원가입하는 방법에 대해서 알아보겠습니다.
Firebase를 사용하면 쉽게 회원가입과 관리를 할 수 있는 장점이 있습니다.
Firebase Authentication은 이메일 로그인, 구글 로그인, 전화 등 다양한 방법을 지원합니다.
회원가입 페이지에서 이메일과 패스워드를 입력하는 시나리오로 만들어 봤습니다.
완성된 모습은 아래와 같습니다.

STEP01. Firebase Authentication 활성화 하기
Firebase Console에 접속해서 해당 프로젝트로 이동합니다.
먼저 Authentication 을 활성화 해줘야 합니다. Authentication 메뉴를 클릭 한 후 시작하기를 눌러줍니다.

시작하기를 누르면 아래와 같은 화면이 나타납니다.
두번째 탭의 Sign-in method를 클릭합니다.
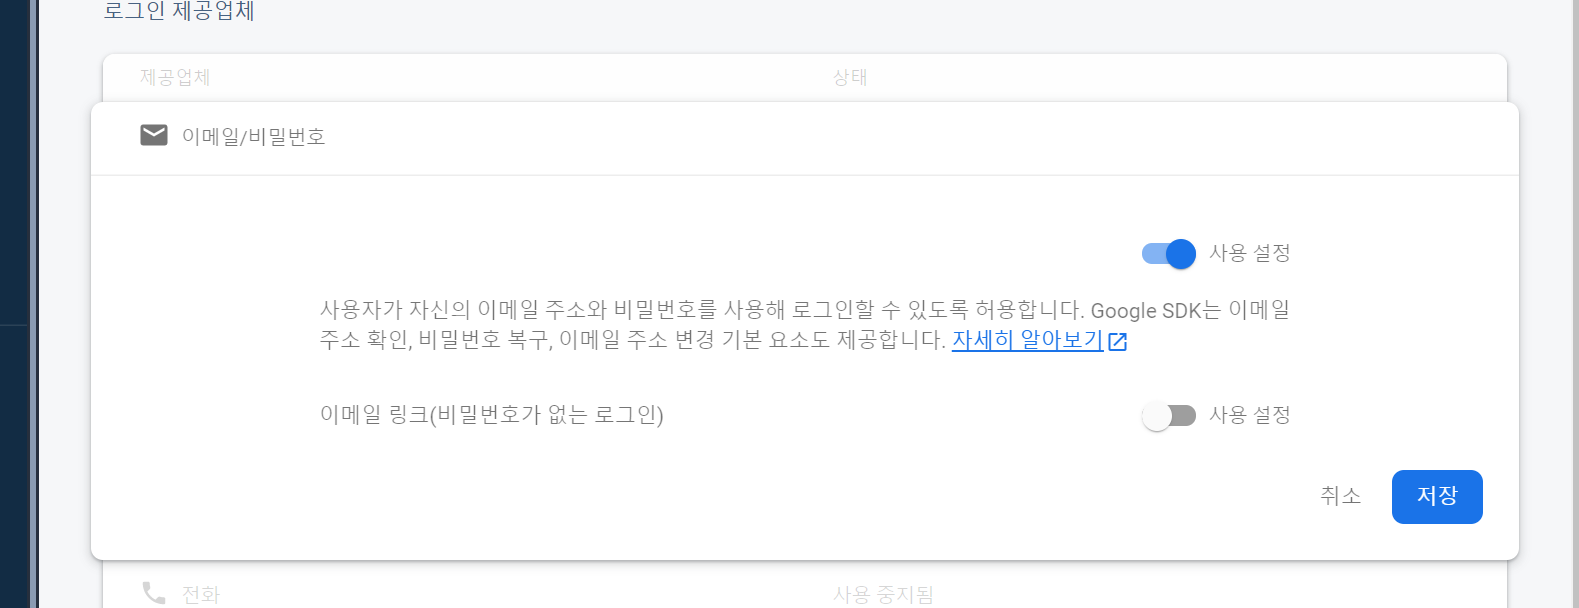
이메일/비밀번호를 사용할 예정으로 이를 활성화 해줘야 합니다. 이를 위해 우측에 수정 아이콘을 클릭합니다.

아래와 같이 설정 팝업이 나타나면 사용설정으로 변경후 저장하기를 클릭합니다.
다시 돌아오면 아래와 같이 이메일/비밀번호 상태가 사용설정됨으로 변경되었습니다.

STEP02. 안드로이드 프로젝트 수정하기
[build/gradl :app]
Firebase Auth 관련 dependency를 추가합니다.
implementation platform('com.google.firebase:firebase-bom:26.2.0')
implementation 'com.google.firebase:firebase-auth-ktx'
[sign_in_activity.xml]
이메일과 비밀번호 그리고 가입하는 버튼, 마지막으로 결과를 보여줄 TextView를 만들었습니다.
<?xml version="1.0" encoding="utf-8"?>
<androidx.constraintlayout.widget.ConstraintLayout
    xmlns:android="http://schemas.android.com/apk/res/android"
    xmlns:app="http://schemas.android.com/apk/res-auto"
    xmlns:tools="http://schemas.android.com/tools"
    android:layout_width="match_parent"
    android:layout_height="match_parent"
    tools:context=".SignInActivity">

    <LinearLayout
        android:layout_width="match_parent"
        android:layout_height="wrap_content"
        android:orientation="vertical"
        android:padding="16dp"
        app:layout_constraintTop_toTopOf="parent"
        app:layout_constraintStart_toStartOf="parent"
        app:layout_constraintEnd_toEndOf="parent" >

        <EditText
            android:id="@+id/edt_email"
            android:layout_width="match_parent"
            android:layout_height="wrap_content"
            android:hint="Email" />

        <EditText
            android:id="@+id/edt_password"
            android:layout_width="match_parent"
            android:layout_height="wrap_content"
            android:hint="Password" />

        <Button
            android:id="@+id/btn_sign_in"
            android:layout_width="match_parent"
            android:layout_height="wrap_content"
            android:text="회원가입하기" />

        <TextView
            android:id="@+id/txt_result"
            android:layout_width="match_parent"
            android:layout_height="wrap_content"
            android:padding="16dp" />

    </LinearLayout>

</androidx.constraintlayout.widget.ConstraintLayout>
[SignInActivity.kt]
액티비티에서 로그인하는 코드입니다. 먼저 FirebaseAuth.getInstance()를 통해 인스턴스를 생성해 줍니다.
일단 EditText값이 유효성 체크는 생략했습니다.
이메일과 패스워드를 입력하고 회원가입하기 버튼을 클릭하면 FirebaseAuth의 createUserWithEmailAndPassword() 함수를 사용하여 회원가입을 진행합니다.
진행결과는 addOnCompleteListener와 addOnFailureListener를 통해 받을 수 있습니다.
class SignInActivity : AppCompatActivity() {

    private var _binding: SignInActivityBinding? = null
    private val binding get() = _binding!!

    private lateinit var auth: FirebaseAuth

    override fun onCreate(savedInstanceState: Bundle?) {
        super.onCreate(savedInstanceState)
        _binding = SignInActivityBinding.inflate(layoutInflater)
        setContentView(binding.root)

        auth = FirebaseAuth.getInstance()

        binding.btnSignIn.setOnClickListener {
            val email = binding.edtEmail.text.toString().trim()
            val password = binding.edtPassword.text.toString().trim()

            // Validate...

            createUser(email, password)
        }
    }

    private fun createUser(email: String, password: String) {
        auth.createUserWithEmailAndPassword(email, password)
            .addOnCompleteListener { task ->
                if (task.isSuccessful) {
                    Toast.makeText(this, "회원가입 성공", Toast.LENGTH_SHORT).show()
                    val user = auth.currentUser
                    updateUI(user)
                } else {
                    Toast.makeText(this, "회원가입 실패", Toast.LENGTH_SHORT).show()
                    updateUI(null)
                }
            }
            .addOnFailureListener {
                Toast.makeText(this, "회원가입 실패", Toast.LENGTH_SHORT).show()
            }
    }

    private fun updateUI(user: FirebaseUser?) {
        user?.let {
            binding.txtResult.text = "Email: ${user.email}\nUid: ${user.uid}"
        }
    }

    override fun onDestroy() {
        super.onDestroy()
        _binding = null
    }

}
STEP03. 결과확인하기
Firebase Authentication 페이지에 신규 유저가 추가된 걸 확인 할 수 있습니다.

'기리's Android 이야기' 카테고리의 다른 글
| [Android/Kotlin] 안드로이드 ViewBinding 사용하기 feat. kotlin synthetics deprecated... (4) | 2021.01.12 |
|---|---|
| [Android/Kotlin] 안드로이드 액티비티 전환 애니메이션 사용하기 (6) | 2021.01.12 |
| [Android/Kotlin] Firebase 프로젝트 연결하기 (5) | 2020.11.11 |
| [Kotlin] 코틀린 Scope Functions(let, apply, run, with, also) 알아보기 (4) | 2020.11.11 |
| [Android/Java] 안드로이드 ViewPager2 이미지 슬라이드 만들기 (10) | 2020.11.11 |

